Once upon a time when we lived in a sticks n’ bricks house I had a bit of a renovation addiction. A fresh coat of paint in the bathroom, new tile in the kitchen, ripping out the carpet in the bedroom…on and on it went. I thought living in an RV would cure this incessant desire for change and improvement. I figured after going through a fairly extensive renovation of the Airstream interior before moving in, I would be satisfied until the day when we transitioned to our next RV (or house). I was wrong. While I love our tiny house, I still find myself constantly dreaming of small (or sometimes big) changes that would improve our living space.
In the past two and half years we’ve made a few minor improvements here and there. A new rug with matching valances & pillows, magnetic panels for our fridge, and a series of framed photos hung on the wall. But apparently that’s not enough to satisfy the renovation bug. What I really needed was a more substantial project that would make a dramatic impact. Something like a new kitchen backsplash perhaps?
Change is good
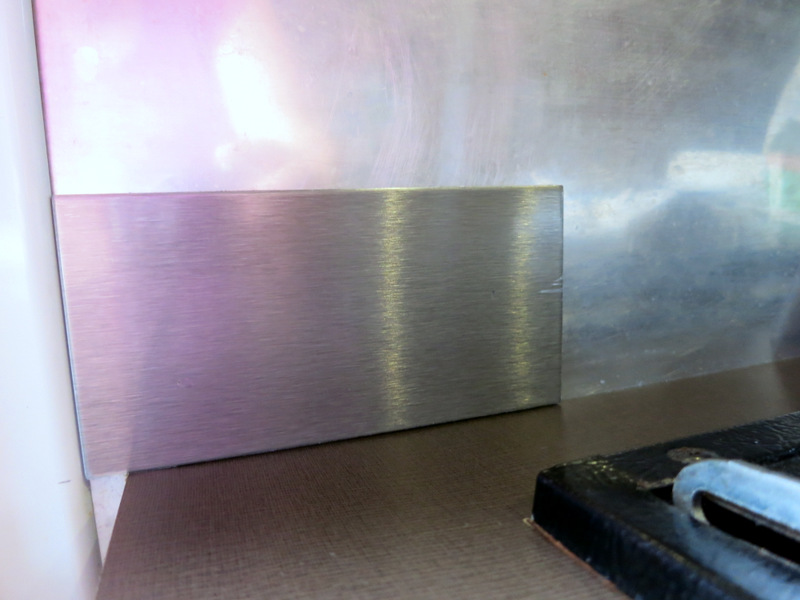
This is actually the second time we have replaced the kitchen backsplash. The original kitchen wall was covered with a lovely gold fern patterned wall paper. We knew right away that had to go. Tim quickly replaced it with a piece of aluminum. It looked great at first, but over time the bare aluminum began to tarnish and develop water spots and scratches. The only way to clean it was with aluminum polish – a messy and impractical solution.
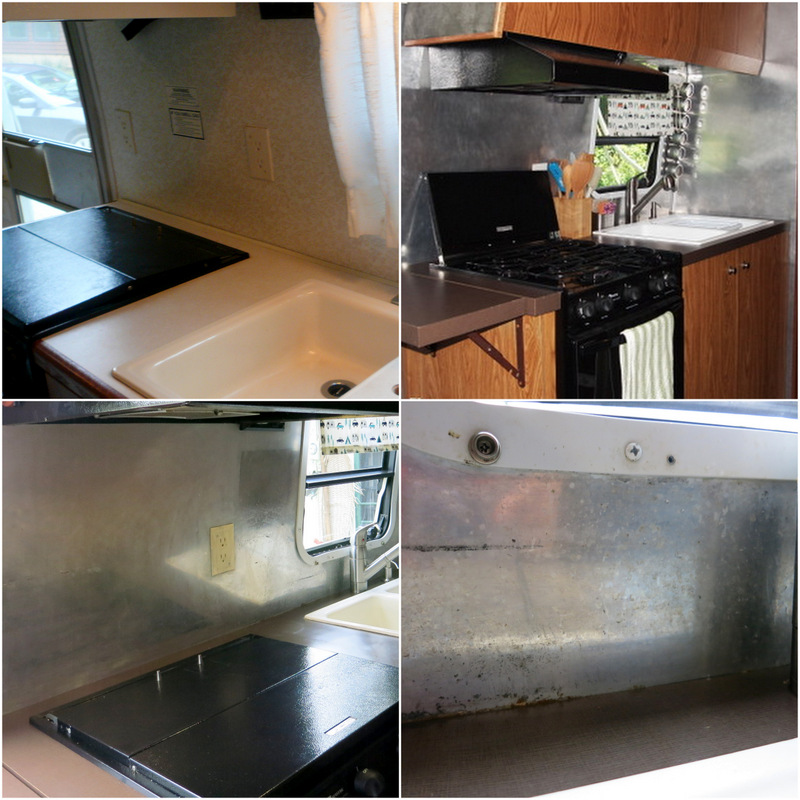
Wallpaper – shiny new aluminum – old dull aluminum – tarnished aluminum
Tim wasn’t 100% convinced that we needed to replace the backsplash, but I was determined to make this project happen. Eventually we settled on peel and stick tiles. Lightweight, durable, and requiring no grout or glue to install, these are the perfect tiles for an RV. We knew we still wanted a metal look, and after a bit of searching came across Aspect Peel and Stick Backsplash Tiles. They come in both glass and metal in a variety of finishes. We chose the brushed stainless 3 x 6 tiles with a long grain. They come in long or short grain, and you can mix and match to create a pattern.
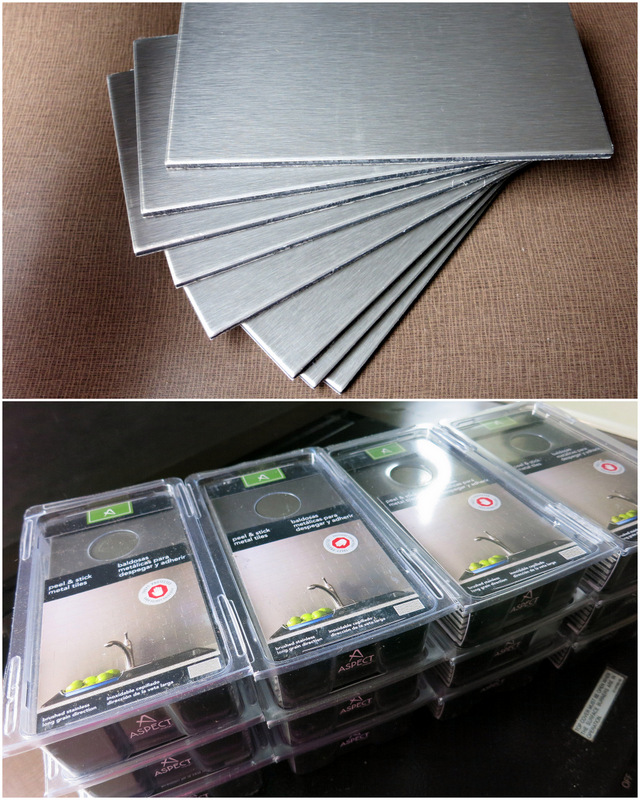
Aspect Peel & Stick Metal Tiles
Where to Buy:
Home Depot carries the tiles, but they don’t keep them in stock so you have to order them online. Luckily we were able to find one extra box at the store so we could take it home and see how they looked before placing the order.
Or you can order them from a company called backsplashideas.com. They charge the exact same price as Home Depot and offer free samples.
How Much of an Investment:
The tiles come in boxes of 8. Each box covers 1 square foot and costs around $16/box. For our project we purchased 13 boxes for a total of $207 + tax.
What You Need to Install:
Enough tiles to cover your space + a few extras for mistakes
Measuring Tape
Screw Driver (to remove switch plates, curtain rods, etc.)
Straight Edge or Speed Square
Utility Knife or Hack Saw for straight cuts
Jigsaw or Coping Saw for rounded cuts
Optional: Matching Trim Pieces & switch plate covers (we didn’t need these, but they are available)
Step 1:
Prepare the surface. There’s not much to this step. The tiles will stick to any surface that is clean, flat, smooth, dry, and free of dust, wax, soap scum and grease. We already had a smooth surface, so we just washed down the aluminum and stuck the tiles over the top. If, on the other hand, you have an uneven surface, it’s recommended that you stick the tiles on with construction adhesive.
Step 2:
Layout your pattern. We already knew that we wanted to go with a subway pattern with one half tile on top of one full tile. We leaned the first row against the wall and figured out that we would need to cut one tile to make it fit. Since the edge on the left side of the kitchen is more visible, we started with a full tile on that side so the cut tile ended up in the corner on the far side of the kitchen. Normal procedure for laying tile dictates a chalk line going both vertical and horizontal as a guide. Since our backsplash was going to butt up flush against the counter (and we determined that the counter was level) we skipped this step and instead tucked the first row up tight against the counter.
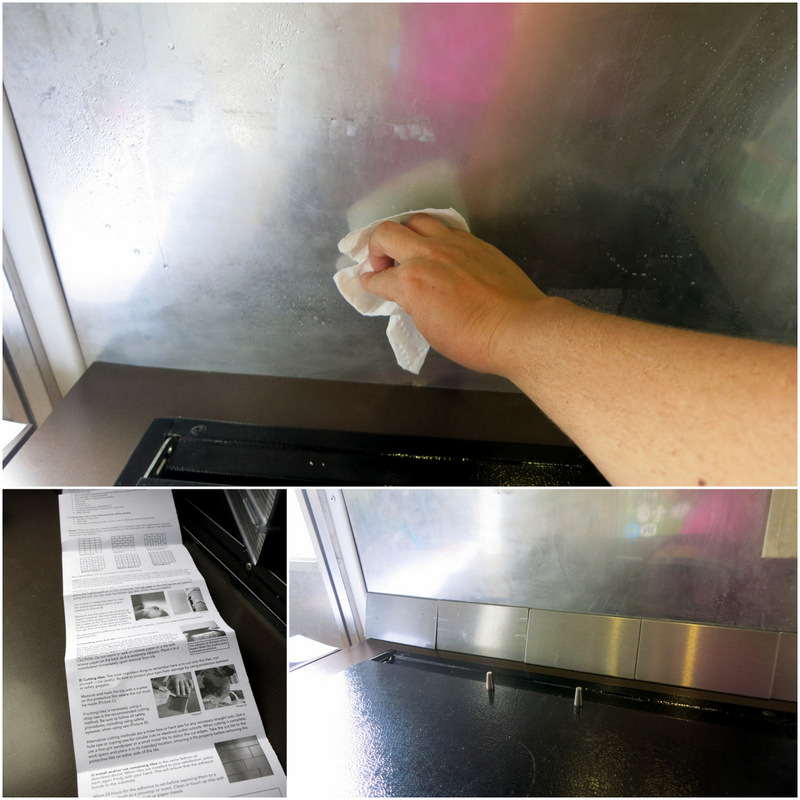
Cleaning, directions, & layout
Step 3:
Time to install the first tile. Simply peel off the white paper covering the sticky side and press into place. The sticky side is very sticky. If you only stick it on lightly then it’s possible to remove the tile within a minute or two, but once you push down firmly there’s no going back. The tile also has a clear plastic covering on the top side. The directions say to remove it before installing, but we wanted to protect the tile during install so we left it on and removed it all at the end.
First tile in place! (the wrinkle on the corner is the protective cover)
Step 4:
Continue the pattern to the end of the wall. This is where our first straight cut needed to happen. There are a couple different ways to cut the tiles. The manufacturer recommends a chop saw, hack saw or utility knife for straight cuts. The only one of those we have is a utility knife, so naturally that was our first option. We marked the tile where it needed to be cut and then using a straight edge drew a line on the protective film. Pressing firmly on the tile we scored the front a few times, applying more pressure with each pass. When it was cut about halfway through we bent the tile back and forth until it separated.
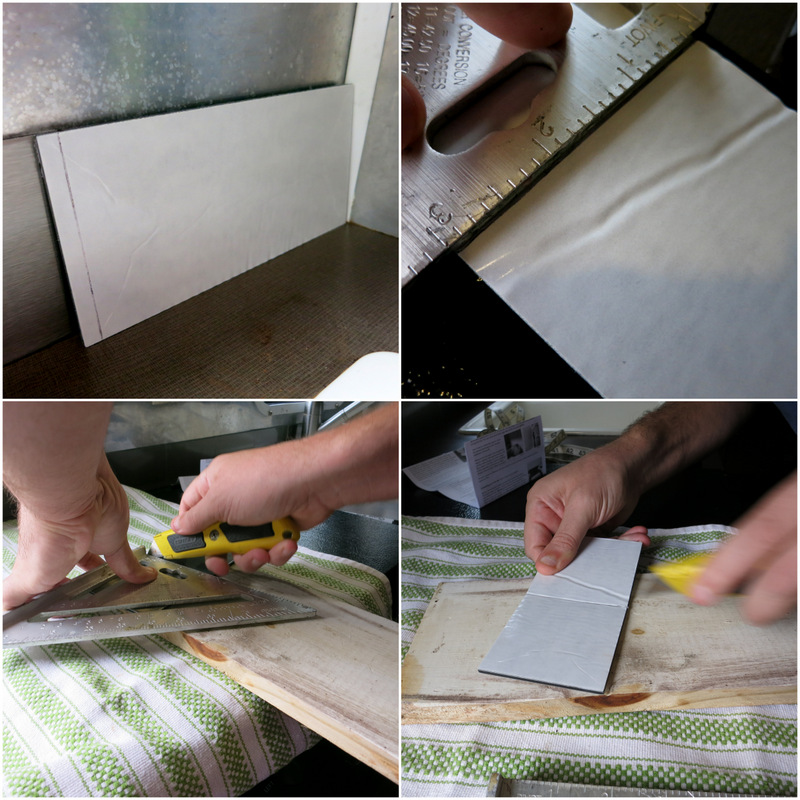
Measure, Mark, Score, Bend
Step 5:
Build the pattern up the wall. We continued up the wall with a half tile to start the second row followed by a full tile to start the third row. We placed each tile carefully making sure that the edges were tight and straight.
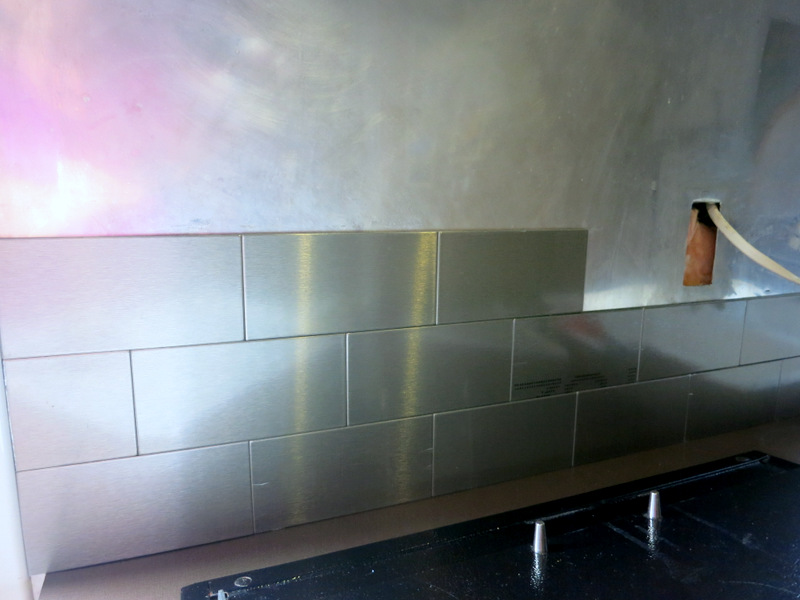
Up the wall (the pink hue is the reflection of my t-shirt)
Step 6:
There were a few special cuts that needed to be made. We had a number of obstacles to contend with including an outlet, our tank monitor panel, and a window with a curved frame. Thankfully we were able to position the cut edges of the tile under all three of these obstacles, removing the need for a smooth curved cut. For the curved cuts Tim used the Jigsaw from my dad’s tool arsenal. As an alternative for the curved cuts the manufacturer recommends a Coping Saw. I have no idea how this tool would have worked, but according to Tim the Jigsaw was perfect for the job.
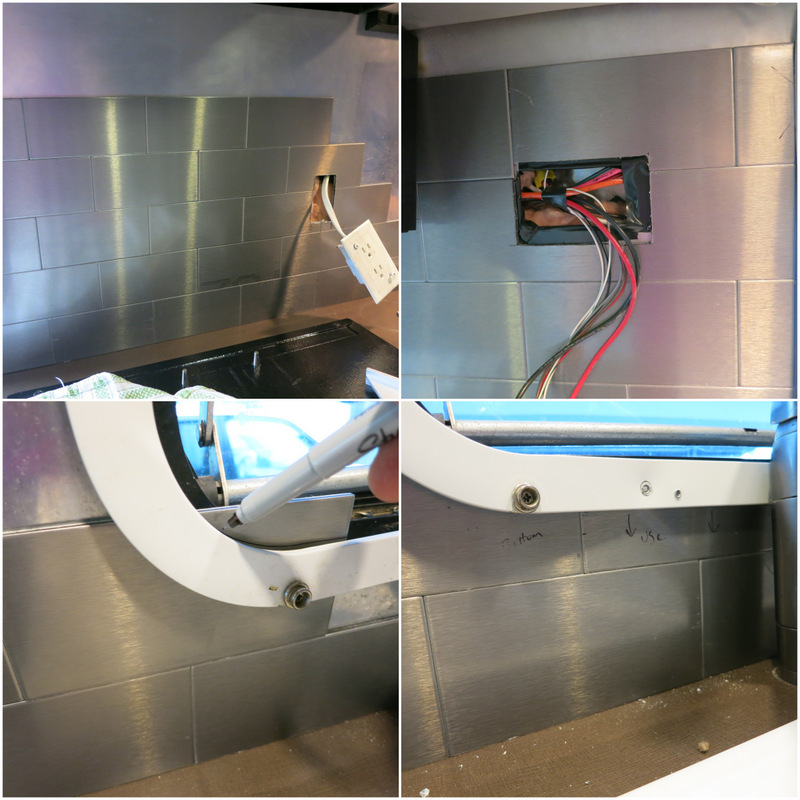
A few obstacles – outlet, tank monitors, curved window frame
Step 7:
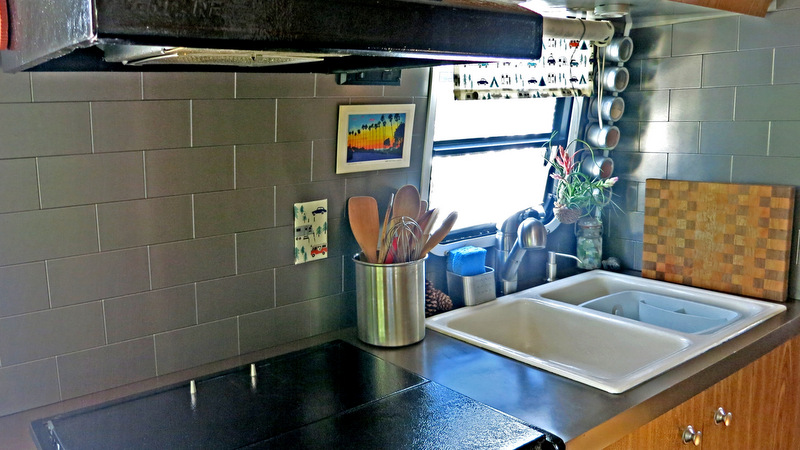
After we finished both walls we peeled of the protective coating and revealed our beautiful new backsplash. The final step will be a thin line of clear caulking where the tile meets the counter (once we go buy some clear caulking). We put the kitchen back together, stood back and admired our handy work.
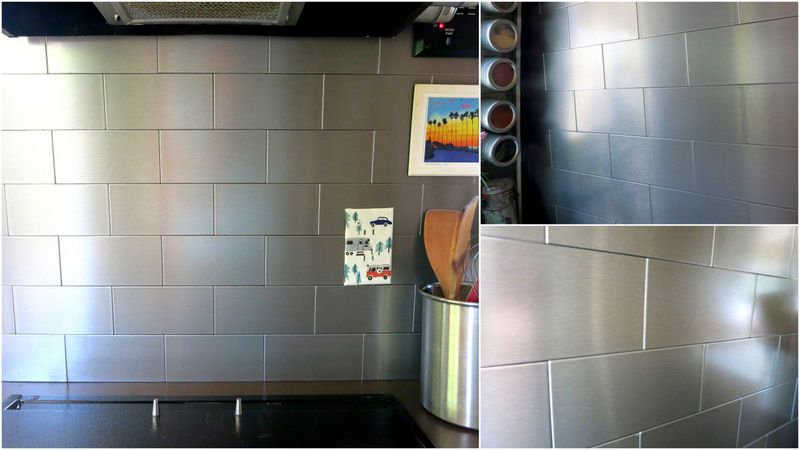
Our beautiful new backsplash
Final Thoughts:
Like all home renovation projects this one took a bit more time and effort then we anticipated. Our kitchen may be small, but it has a few tricky spots (like the curved side wall) that required a lot of measuring and cutting. While I think we could have gotten the job done with the tools we have on hand, I am glad we chose to tackle this project at my dad’s house where we had access to his supply of power tools.
Overall, the peel and stick tiles are much easier to install then traditional tile. When we did the bathrooms, kitchen, and entry way in our house (yes, we have done a lot of tiling) each room took several days to complete while we waited for the mortar and grout to dry. It was also messy and left us with aching backs and knees. The peel and stick tiles only took us one afternoon to complete and required very little clean up.
In the end we like the result so much that we’re now considering a similar project for the bathroom. The renovation bug can never be squashed!
26 comments
Looks REALLY nice! I’m going to have to do something when I get to the kitchen in my house and these might just be the ticket!
I wish we had done something similar to this in our house. It’s soooo much easier than dealing with real tile.
This looks great! Love the choice of tile. I bet the airstream looks better than ever now. I am feeling inspired…thanks!
Thanks Todd! I like to inspire. Maybe you will catch the renovation bug too :)
Looks great Amanda and I think you picked the perfect tile for the Airstream. Last October I did a similar remodel project. We also stripped off all the stupid wallpaper border that circled the RV. Made a big difference. Now the window treatments are really starting to bother me, but I’ve promised hubby to hold off. Just not sure how long I can last, which I’m sure you can relate to.
Why do RV manufacturers choose such horrible wallpaper? No one ever likes the wall paper in their RV! I say go for it with the window treatments. I mean it is your house right?
Excellent.. and thanks for sharing. When we got our bus, we have visions of something like this. But opted to just paint with a stainless steel paint for now. This has me inspired to potentially tackle an upgrade :)
Oh goody! I like to inspire upgrades. We were a little hesitant to use these tiles, thinking they might be flimsy and cheap looking. But after seeing the results I would highly recommend this brand. Go for it!
Love the new backsplash. Kuddos to you and Tim for taking on the home improvement project. Looks great. Also love the detailed directions. Thanks
Thanks Karen! Renovations on the road are a bit more challenging, but the results make it all worth while.
Awesome job, that would be a huge improvement on our rig. Cheers
It has had a bigger impact on the look of our interior than we anticipated. Our course, that just means the desire to make more improvements is stronger than ever :)
Love the look you chose…fabulous! I wish RV manufacturers would come around to the 21st century and start installing wallpaper and fabrics that appeal to the masses.
I agree. Sometimes it’s hard to believe that anyone likes the pattens and fabrics that come in RVs.
Perfect choice of tiles, and it turned out great! You guys are so good at this stuff. Come live with us please. : )
If we lived with you could we play with your new puppy? (and thanks for the nice compliment)
great work! We may do the same thing in the spring. Thx again for the super ap to reserve campgrounds. We are in Venice for a couple days- loved the Keys and Everglades Natl Park. Posted pics from the Everglades on our blog.
I would highly recommend the Aspect tiles. They were easy to work with and seem to be a good quality product. Happy to hear the the reservation site it working out so well for you!
Great job, Amanda—very professional and attractive. We’re going to do some kind of backsplash in our new Arctic Fox—there’s no weird wallpaper border, but instead a weird wallpaper backsplash. Who the heck are they hiring as designers?? We were big renovation addicts in our home, too—now we just do the same thing in our RV. It’s fun. ;-)
All wallpaper should be banned from RVs! It is fun renovating in an RV isn’t it? I love how small and manageable each project is compared to a full size house.
Now that it has been more than a year since you installed the back splash I wonder how you like it now and how it has held up under use. How easy is cleaning?
Good question. It has held up beautifully. No signs of any tiles loosening, and the cleaning is a breeze with a microfiber cloth. If we did it all over again we would choose these same tiles in a second!
We are using a small mosaic tile in the bathroom. What adhesive would be recommended? Thank you.
We didn’t use any additional adhesive other than what is on the back of the tile. Almost 2 years later and have not had any issues.
Thank you so much for your blog. How did the peel and stick tiles hold up over time? Would you still recommend them years later?
They have held up very well. None have come loose or fallen off the wall. The only potential issue is that due to the thin metal coating, they scratch easily and we have a few around the sink area that have small marks on them from getting bumped by pots and pans. Despite that, I would very much recommend them!