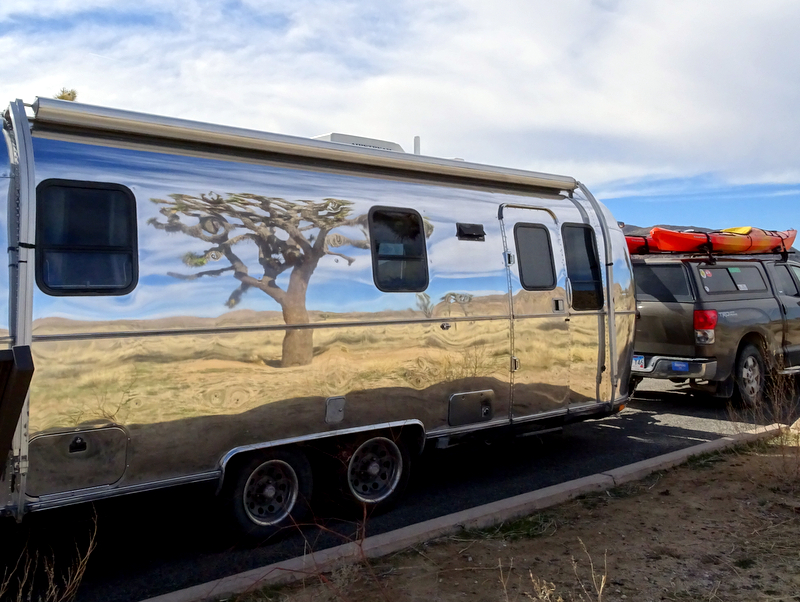
So shiny!
When we decided to sell our house and live full time in an RV we thought one of the perks would be an end to the incessant amount of around-the-house projects and repairs. Ha! How wrong we were.
Since we started full-time RVing almost four years ago we have taken on a long list of projects, both out of necessity (repairs) and also out of our never ending desire to renovate and improve (new kitchen backsplash, new bedroom curtains, fridge front re-face…and more). I think part of the problem is that we’re DIY-aholics. Which means that as much as we might grumble about this project or that project, the truth is that we both enjoy around-the-house projects.
So in the spirit of getting our DIY fix this winter we we took on the most ambitious project yet — Airstream polishing. This is a big job. We knew it would be a big job, and we knew it would be a difficult job. In fact, we even (gasp) considered hiring someone to do it for us. There are a number of reputable businesses around the country that specialize in polishing Airstreams, and spending the winter on the west coast meant we could have easily made it happen. But in the end, we decided the inconvenience of leaving our house and finding an alternative place to live for at least a week wasn’t worth the hassle. Also…DIY-aholics. So we polished the Airstream ourselves and lived to tell the story.
But before we get into all of that, how about a little background on why we would take on such a task.

Mirror finish
Why Polish?
Polished Airstreams are about much more than creating a shiny “pretty’ look. There’s a reason behind the madness. The skin of an Airstream is made of aluminum covered with a protective layer of clearcoat — or more precisely a product called Plasticoat developed for Airstream. This is not the same as the clearcoat used on cars, boats and other RV brands. Over time, exposure to the elements can cause the clearcoat to “fail” and peel off leaving exposed the bare aluminum that oxidizes and turns discolored. Once this happens there are basically three options:
- Let it happen and simply live with the patchwork look. Most clearcoat fails begin along the roof line and high up on the curved end caps where the sun breaks down the clearcoat. An Airstream with a mild case of peeling clearcoat is not terribly unsightly to a casual observer. BUT, it is guaranteed to get worse over time and the longer you leave it as is, the more oxidized the now bare aluminum patches become, and the more effort it will take to restore.
- Strip off the remaining clearcoat and replace with a new layer of clearcoat. This is most definitely NOT a DIY option (unless you happen to have a sealed paint booth in your back yard), and paying someone to apply clearcoat to an Airstream is crazy expensive. Very few people go this route.
- Strip off the remaining clearcoat and polish the raw aluminum. This is a tedious and time consuming process that an amazing amount of people take on themselves. There are massive threads on the Airforums dedicated to polishing, and the art of Airstream polishing has reached a level of popularity that seems to be bordering on trendy these days.
Our Story: Polishing Round One
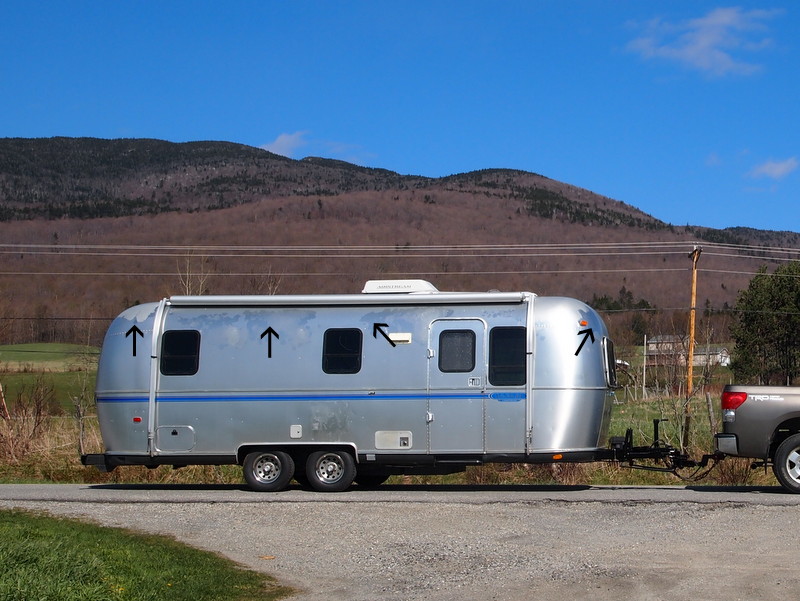
We never set out to have a polished Airstream. We simply bought the Airstream that we could afford at the time which happened to be a 1999 with some clearcoat peeling off the end caps and at the top near the awning roll. Our first inclination was to leave it and maybe someday hire someone to strip and polish it for us. We had already committed to renovating much of the interior, were deep in the process of paring down our possessions and getting our house ready to sell (which of course involved a slew of DIY projects), and simply didn’t think there was time to deal with the clearcoat issue. But then sometime in between our house selling in a record two weeks, learning that our septic system needed to be dug up and re-done, and dealing with an ongoing plumbing issue in the house, we decided to take on the project of Airstream polishing. That crazy DIY bug strikes again!

Airstream before polishing – the arrows point to where the clearcoat was peeling
It came down to the fact that we had put a whole lot of time and effort into the Airstream interior and wanted the outside to match the inside. So with a month to go until our house closing we began to strip off the remaining clear coat. This was a terrible, tedious, time consuming project that I hope to never, ever repeat. We used a product called CitriStrip that you basically paint on, let sit and then wipe off. In theory the clearcoat should simply peel off with the CitriStrip. In reality it often required multiple aplications in combination with various brushes to “scrub” off the clear coat without damaging the aluminum underneath. Believe it or not, a toothbrush ended up being the best tool for the job.
Once the clear coat was gone the polishing began. The most common product for polishing Airstreams is called Nuvite. It comes in seven different grades that are used in succession to remove oxidation and scratches, and provide that mirror-like shine Airstreams are so famous for. You don’t have to use all seven grades –in fact, most people only use three or four — but we knew that even that many would take far more time than we had. So we did some research and came upon a product called Gord’s Aluminum Polish.
The Gord’s is applied in a thin layer and then polished off with a rotary polisher. Because it only requires one step it took a fraction of the time as compared to the Nuvite. It also only worked a fraction as well. Gord’s is basically the equivalent of the first one, maybe two, grades of Nuvite. Meaning that while it did a good job removing the oxidation and minor scratches, it did leave behind some fairly unsightly swirl marks (a normal result of polishing) and never quite got it as shiny as a typical polished Airstream. The reason was because we missed out on the final polish grade whose job it is to remove swirl marks and up the shine level to maximum. But at this point we were out of time and itching to get on the road. It did look better than when we started and for the first six months had a pretty eye catching shine.

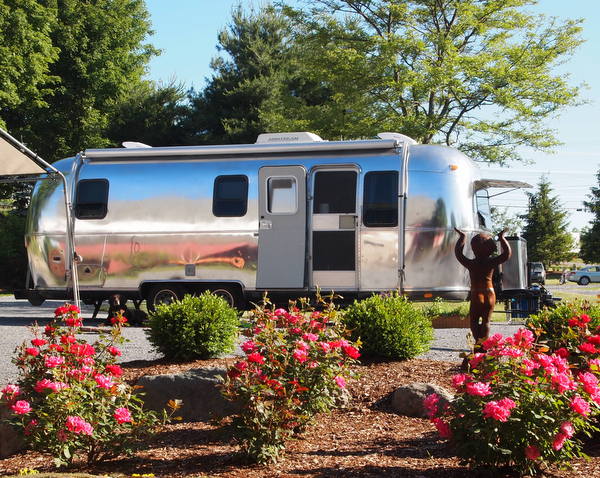
After polishing round one
Polishing Round Two
The first round of polishing took place in May of 2012. Fast forward to the winter of 2016 and we were in desperate need of another polish. Over the years the bare aluminum had begun to develop oxidation and water spots. We had also accumulated a hefty dose of scratches. From afar it still looked great, and in photos it looked even better, but up close it was in a pretty sad state.

Up close view: Oxidation, water spots, and scratches
This time around we decided to do it the proper way using more than one polish grade. Except we still didn’t use the popular Nuvite brand, instead choosing a newer product called Bright Work Polish. Bright Work is commonly used in the aviation industry.
Bright Works Polish comes in three grades:
- Red for removing oxidation and scratches.
- White for removing water spots and reducing cloudiness.
- Blue for removing the swirls and giving it that oh so shiny look.

Bright Works Polish + our two polishers
*Before we get into the nitty gritty details, I want to stress that this in NOT a “How To” kind of post. Even after going through the process we are in no way qualified to teach anyone how to properly polish an Airstream. This was very much a learn-as-you-go project for us and we definitely made some mistakes along the way. If you want more information about Airstream polishing I have put together a list of resources at the end of this post. If you have polished your own Airstream and want to add some advice, tips, or tricks feel free to add them in the comments. But please don’t view this as a guide to Airstream polishing. We are in no way experts and this post is simply an account of our experience.*
We split up the work with Tim tackling step one and two, and me tackling the final step and clean up. In theory it should have been a pretty straight forward procedure. You put a scant amount of polish on a small section of the Airstream and polish until it’s gone. The reality was that we struggled with the amount of polish, the speed of the polisher, the polishing pads getting gummed up easily and then creating more scratches, the varying outside temperature affecting the polish, and most of all, our exception that after all this work the result should be nothing short of perfect.

Tim working on step one
The first two grades (red and white) were applied with a Makita Polisher. This is the same tool that we used the first time around with the Gord’s and it performed well on both occasions. There are other comparable brand polishers out there, including a Dewalt that you can buy through Vintage Trailer Supply. As far as my knowledge goes there is little difference between the brands and they perform the same function (and basically cost the same). For polishing pads, or bonnets as they are properly called, we used the recommend Hook and Loop Wool Pads.

Using ingenuity to get the job done
The first step did a great job of removing the oxidation and most of the scratches. Not all of it though, and even after going back over a few spots we were still left with problem areas that refused to clean up perfectly. We’re still not sure if this is normal, or if a we simply didn’t spend enough time on these areas.

After step one and two
After the first two steps were left with a surface fairly free of blemishes, but full of swirly polishing marks. This is where I came in. Step three removes the swirls and adds the shine. I used a smaller, orbital polisher to apply step three. We experimented with a bunch of different pads and ended up liking the Lambs Wool Hook and Loop pad the best.
One of the major struggles I had with step three was the polish gumming up on the pad and leaving behind a web of fine scratches on the aluminum. One section was so bad that Tim had to go back and re-do it with both the red and white polish. It was a learning process for sure. We did figure out how to best clean the pads eventually (mineral spirits to the rescue) and we also determined that the pads mentioned above were the least likely to gum up. Of course, I don’t have a photo of the lambs wool pads, but I do have one of our second favorite, the Wool Blend Polishing Bonnet.

The orbital polisher with a wool blend pad
Aside from the pad issue, I also leaned the hard way that step three only requires a tiny amount of polish, and that the polisher needs to be set at a much higher speed then I originally thought (hold on tight — this baby is fast at high speeds). When I finally got it dialed in the results were pretty impressive.

Progress: One side done

Close up – also it’s really hard to take a close up of a polished Airstream
Time & Money
Time Spent: We didn’t keep track of how much time we spent polishing, but we started on January 9th and finished about a month later. During that time we didn’t polish every day, and we never polished all day, but my best estimate would be that combined we put in about 120 hours.
Cost:
Makita Polisher – $180 (we already had this from our first round of polishing)
Porter-Cable Polisher – $120
Various Polishing Pads – $100 approximately (we didn’t use all of these pads)
Polish – $150 (16 ounces of each grade – we used all of the red, most of the white, and only about half of the blue)
Microfiber cloths – $40 (we still have some unused cloths)
Total spent: $490
Not bad considering that we still have both polishers, a bunch of pads, and half a container of the blue polish that we will use next time. Also not bad considering the going rate for polishing an Airstream is around $150 per foot.
What Now?
Aside from enjoying the shine, now we wait until the oxidation and water spots re-develop, and then we do it all again. Except this time we will definitely not wait as long, and now that it’s been properly polished it should take less time and require less steps. Most people recommend re-polishing an Airstream every six months to a year. Yes, you can apply a non-wax sealant made for cars and boats, but the jury is out on whether it really slows down the rate of re-oxidation, and you need to remove it before re-polishing. So, like most people with polished Airstreams we decided to let it go au naturel and accept that it will inevitably need to be polished again.
In the meantime, we’re trying to be more vigilant about wiping off water spots after it rains, washing it on a more regular basis, and staying away from things that scratch. Since we live in it full-time we can’t keep it out of the rain, out of the sun, or away from the salty ocean air (the last one we could do, but where’s the fun in that?), but we can put more effort into keeping it clean and commit to re-polishing at least once a year. On that note, I need to go outside and wipe off the water spots from yesterday’s rain storm…
Airstream Polishing Resources
How to Polish a Vintage Airstream
Airstreamguy.com: Step-by-step Polishing
The Art of Airstream Polishing (video)
VintageAirstream.com
Airforums: Cleaning, Stripping & Polishing
The items on this page are part of our Amazon affiliate store. We are paid a small percentage if you click through and purchase an item. The prices are the same as buying directly from Amazon and the funds help cover the cost of running this blog. Thanks so much for your support!

20 comments
It is crazy beautiful. Great job Tim and Amanda. We love the way it looks but unfortunately do not feel we can successfully do that. Off to P&S next year to spend crazy money…that is the plan.
Thanks Kat! No shame in having someone else do it. In the end the result will be beautiful and despite the cost it will only increase the value of your AS. Hope to run into you guys again next year when we return east.
So shiny, so pretty! Love the photo with the mirror reflection of the Joshua Tree. But wow, what a daunting project!
She is pretty isn’t she? The Joshua Tree photo was a complete accident. It just happened to be a convenient place to pull over and then we noticed the reflection. Maybe we should try for a series at different national parks?
All I can say is that’s one shiny airstream. Wow!!!! Great job!
Nina
Thanks Nina! We do love the shine!
Beautiful! Thanks for the post!
Thanks Laurie :)
Thank you so much for posting this! You did an amazing job.
I’m gearing up to polish my 1995 Sovereign and this is very helpful. How did you get rid of your blue stripes?
http://amzn.to/1P0fBFn
It is like a giant eraser.
Absolutely beautiful!! Makes for a great upper body work out I bet.
Oh yeah, those polishers are heavier than they look!
Wow, your Airstream is gorgeous! I’m envious of all the reflective photo opportunities you’ll have. We are now finally full-timing too. Caved and bought a new Classic. It’s pretty but not the head turner yours is!
Congrats on taking the full-timing leap and your new AS! While we love our little home, I am always jealous of those with brand new rigs. Enjoy!
Tim & Amanda,
We are planning to start full-time Airstreaming this July. Hope to see you on the road.
We are blogging the preparation and sale of the house as we get ready for the adventure in our 2001 30′ Excella Airstream. Our website is http://www.LivingInBeauty.net
Congratulations! Hope to see you out there :)
Yeah, that mirror shine looks like a painting hanging in a museum. Very nice job!
Curious. Why did you settle on the brand Airstream vs. another brand of camper?
What did you do to keep the polish off you window rubbers? Thanks
Nothing. We kind of forgot to cover them with anything. Fortunately, wiping the polish off with mineral spirits worked fine.